Fresh Leaf Indigo Experiments
This past week I traveled up to northern california to take a workshop with living treasure indigo dyer John Marshall. Every summer he opens his incredible dye and textile studio to teach indigo workshops (I highly recommend visiting his website now to add your email address to his Newsletter list if you’re interested in finding out about learning opportunities- http://www.johnmarshall.to/index.htm) The blackberries were in full fruit and the late august temperatures rose to 100, barely dipping into the low 60’s at night, John’s studio situated in a 150 year old flour mill with extensive space and lofted 18 foot ceilings stayed a perfect temp as we scurried about trying to complete all the fresh leaf indigo tests, katazome stenciling & dyeing, sukumo vat making, and fresh leaf reduced vat making as possible. This was John’s first ever formal Advanced Natural Indigo class and it was wonderful to try out and see him demonstrate many of the techniques and recipes covered in his newest procedural and pragmatic book about working with home grown indigo “Singing the Blues with John Marshall” (also highly recommended).


I wanted to share in this post specifically about our adventures in experimenting with the simple fresh leaf process using japanese indigo and all the variables that can have an effect on color and outcome as well as some of the tips and tricks I learned for refining and optimizing the process. We started by making a very large (picture a big sports team gatorade size vessel- probably around 5 gallons or so) batch of fresh leaf indigo juice. For instructions on how to dye with fresh indigo leaves visit my blog post here or this wonderful tutorial on Turkey Red.
Keeping the liquid in a cooler was instrumental in allowing us enough time to work with this dye bath, especially since ambient summer temps can get the better of even the swift moving indigo dyer, because if your fresh leaf harvests go anything like mine there’s always something or two little someones to distract you between cutting the indigo stalks and getting the fabric in the fresh leaf indigo solution.

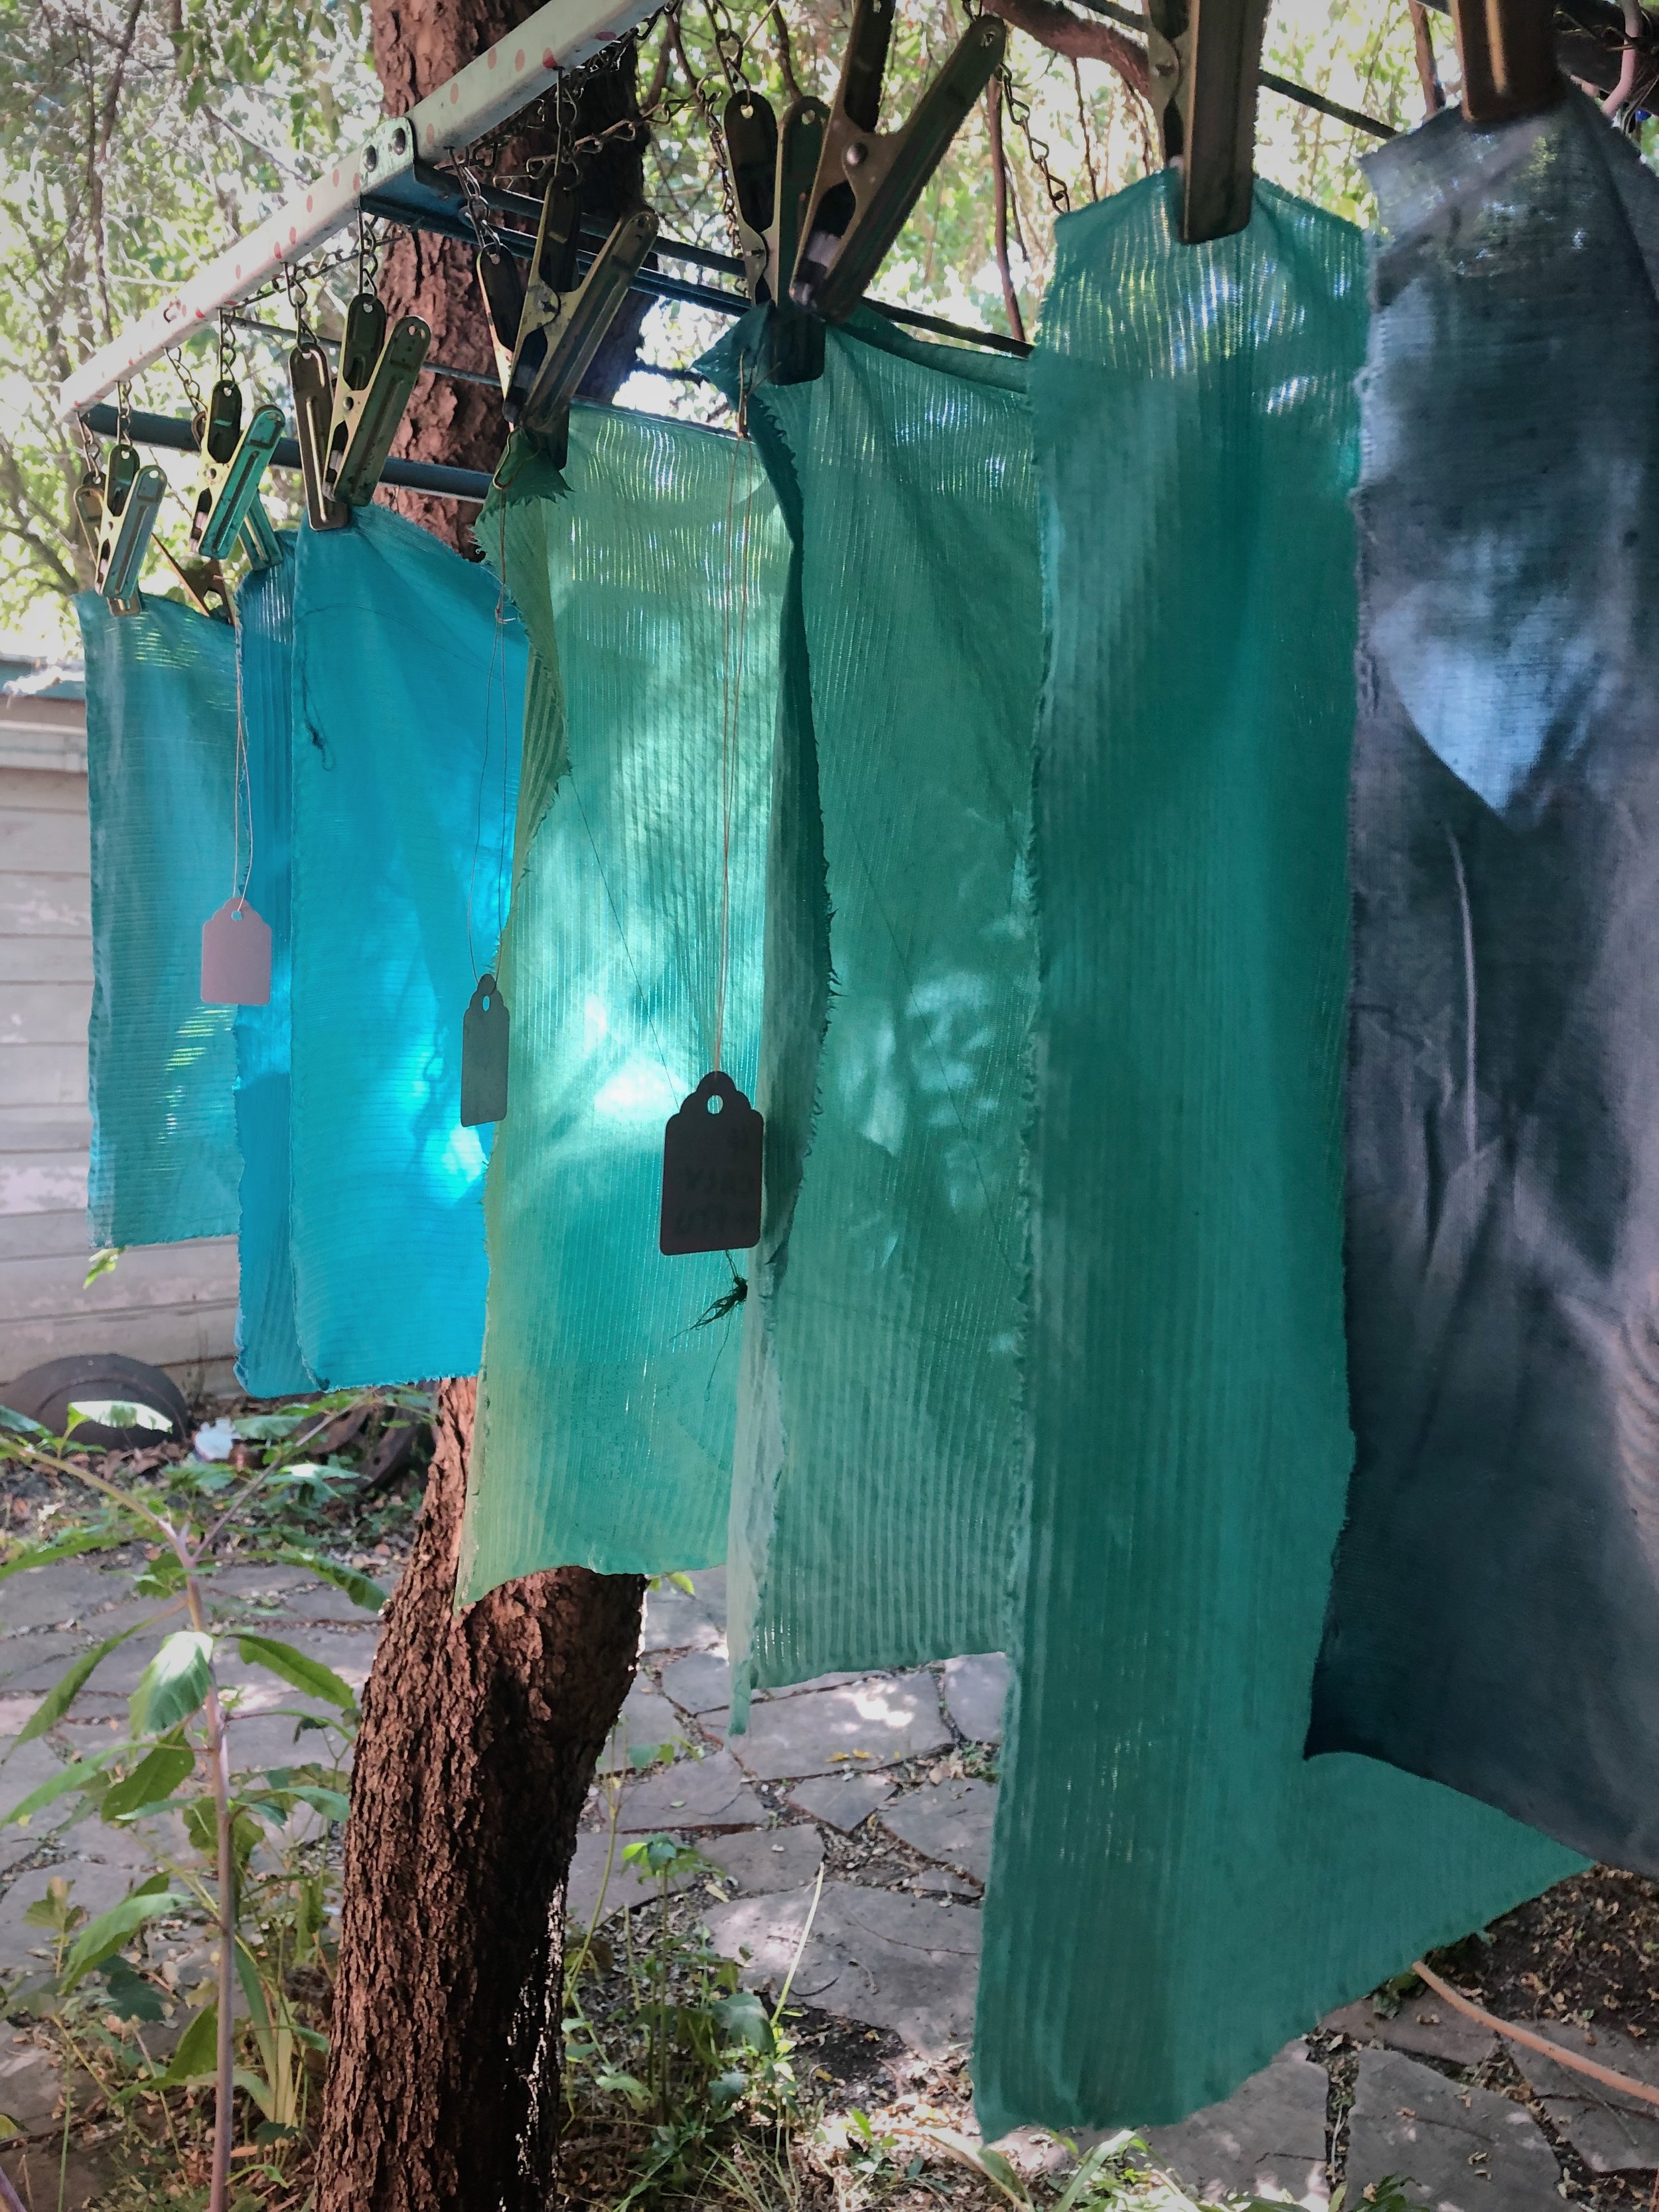

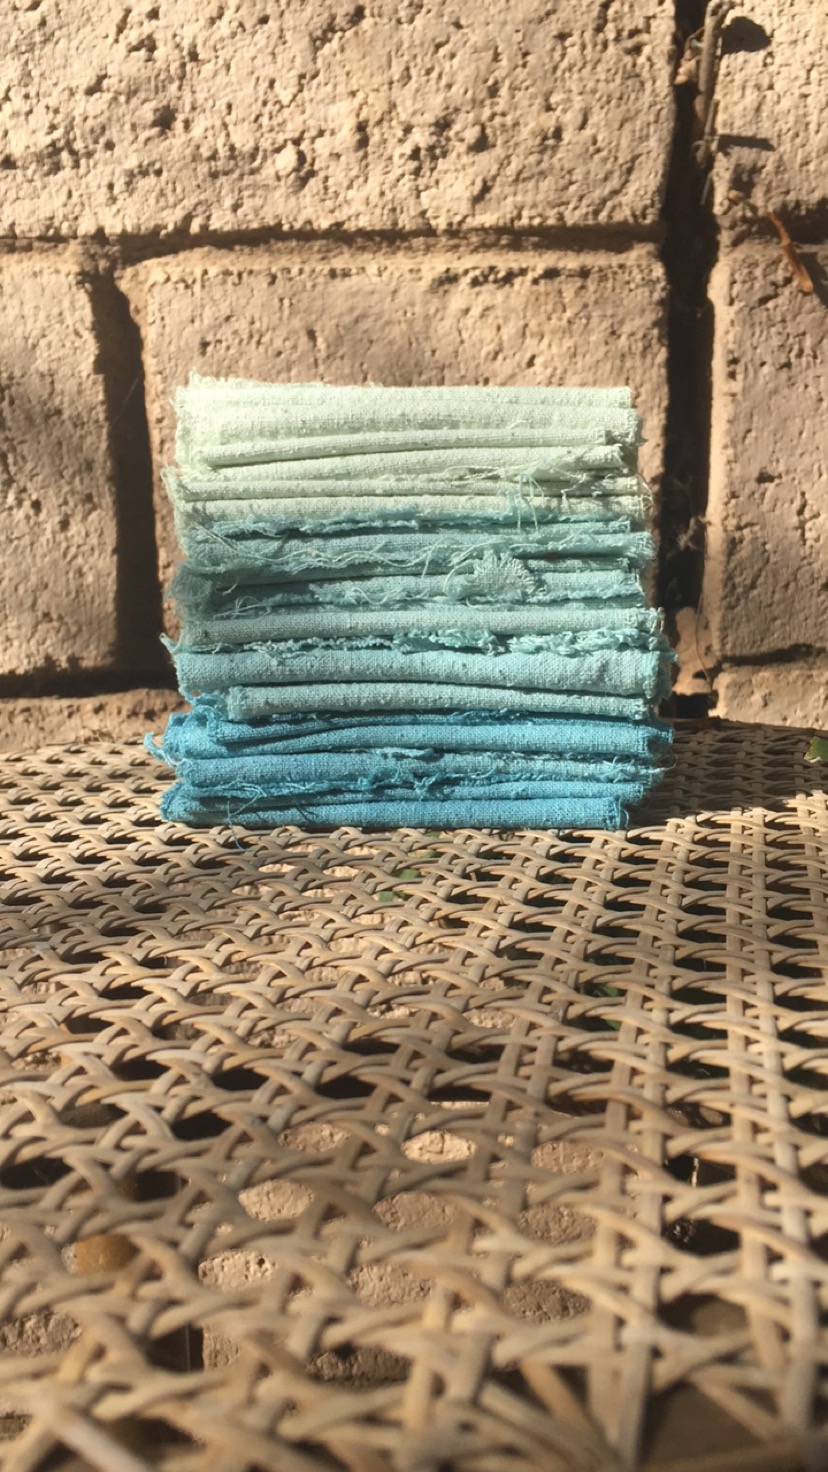
Above: keeping indigo leaves fresh with a spritz of cold water, fresh leaf indigo samples drying in John’s outdoor deck studio
It’s very important with using fresh indigo (or ‘Tadeai’ as known in Japan) that you start with leaves that have been picked straight from the garden in the morning & work quickly with cold water while processing to keep a naturally occurring enzyme called Beta Glucose ( ß-D-glucose) from combining with the Indican (indigo precursor). If allowed to combine with the enzyme- Indican will convert to something called ‘Indoxyl’ and seek oxygen when it can easily be aerated and made alkaline to become ‘Indigotin’ -what we all know as indigo blue pigment. The cold temperature helps keep a process called hydrolysis from happening where the leaves begin to break down liberating the indigo making molecule (indican) and the enzyme (beta glucose) from their separate forms.
Once the enzyme (beta glucose) has expired, the available indigo in solution (transitioning from something called indoxyl to indigotin in the presence of atmospheric or aqueous oxygen) will not readily combine with fiber or ‘dye’ it, without something called reduction (the elimination of oxygen- requiring specific chemical reaction and the addition of an alkaline ingredient & reducing agent).
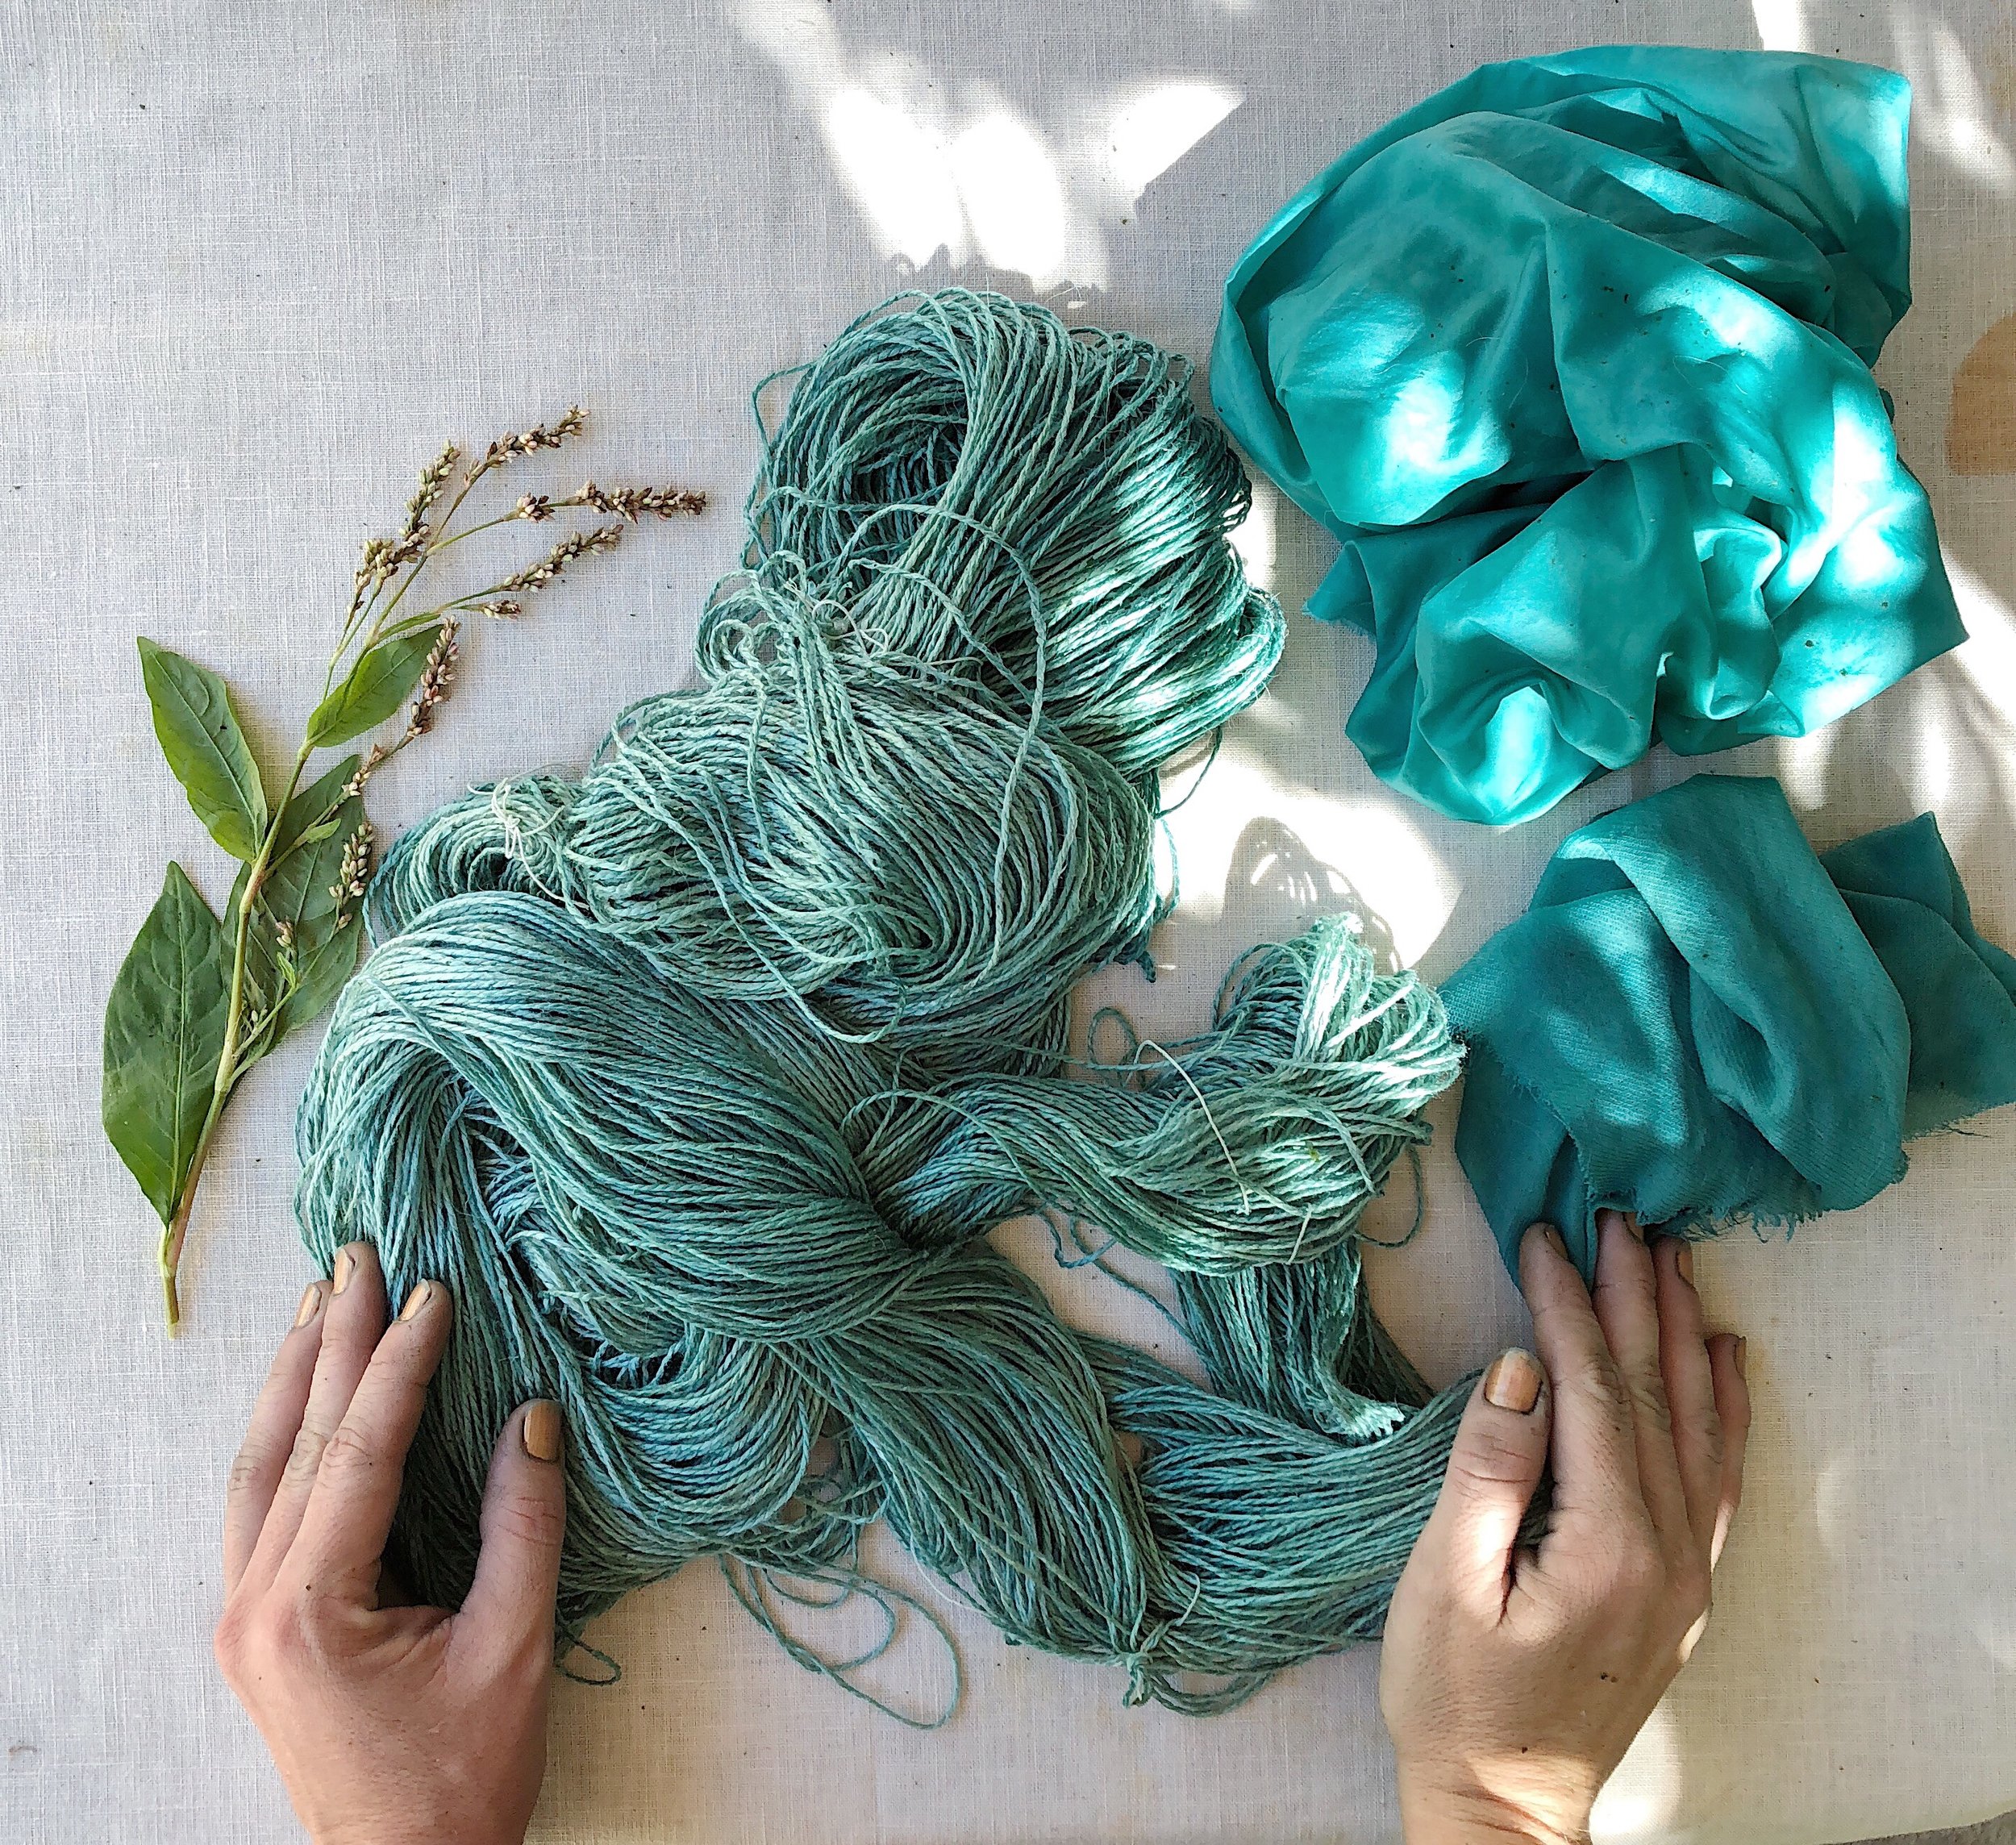
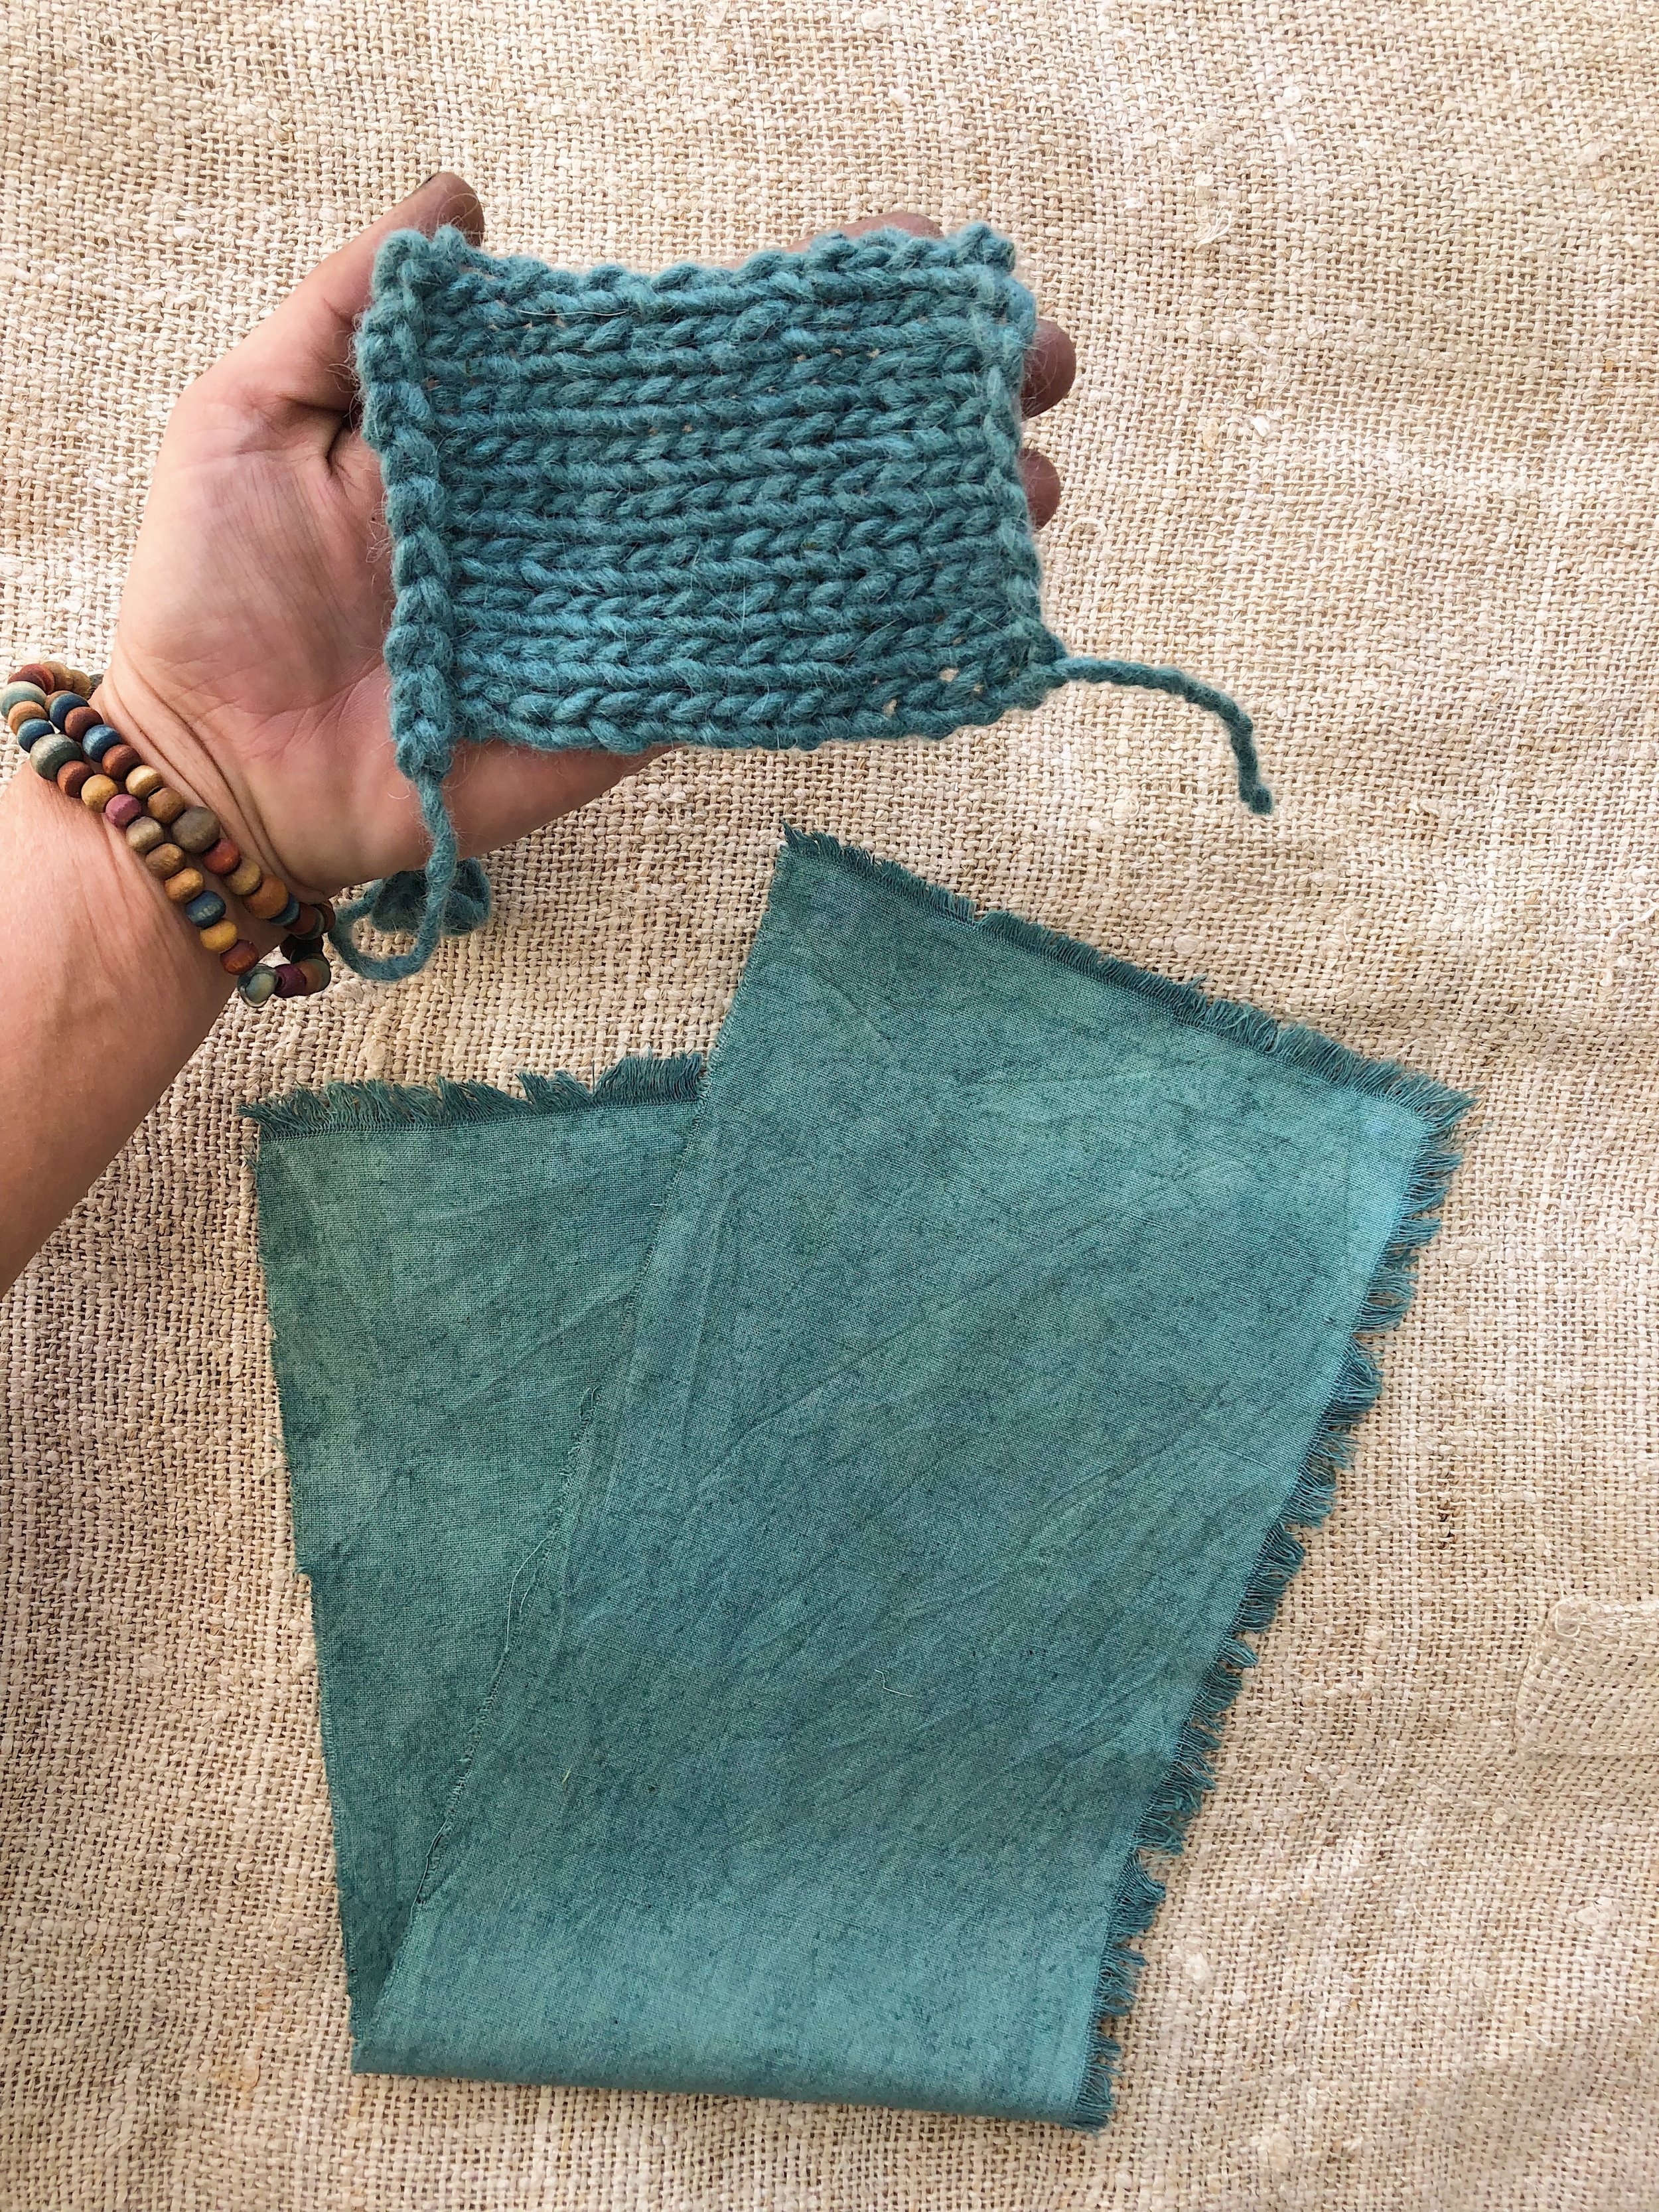
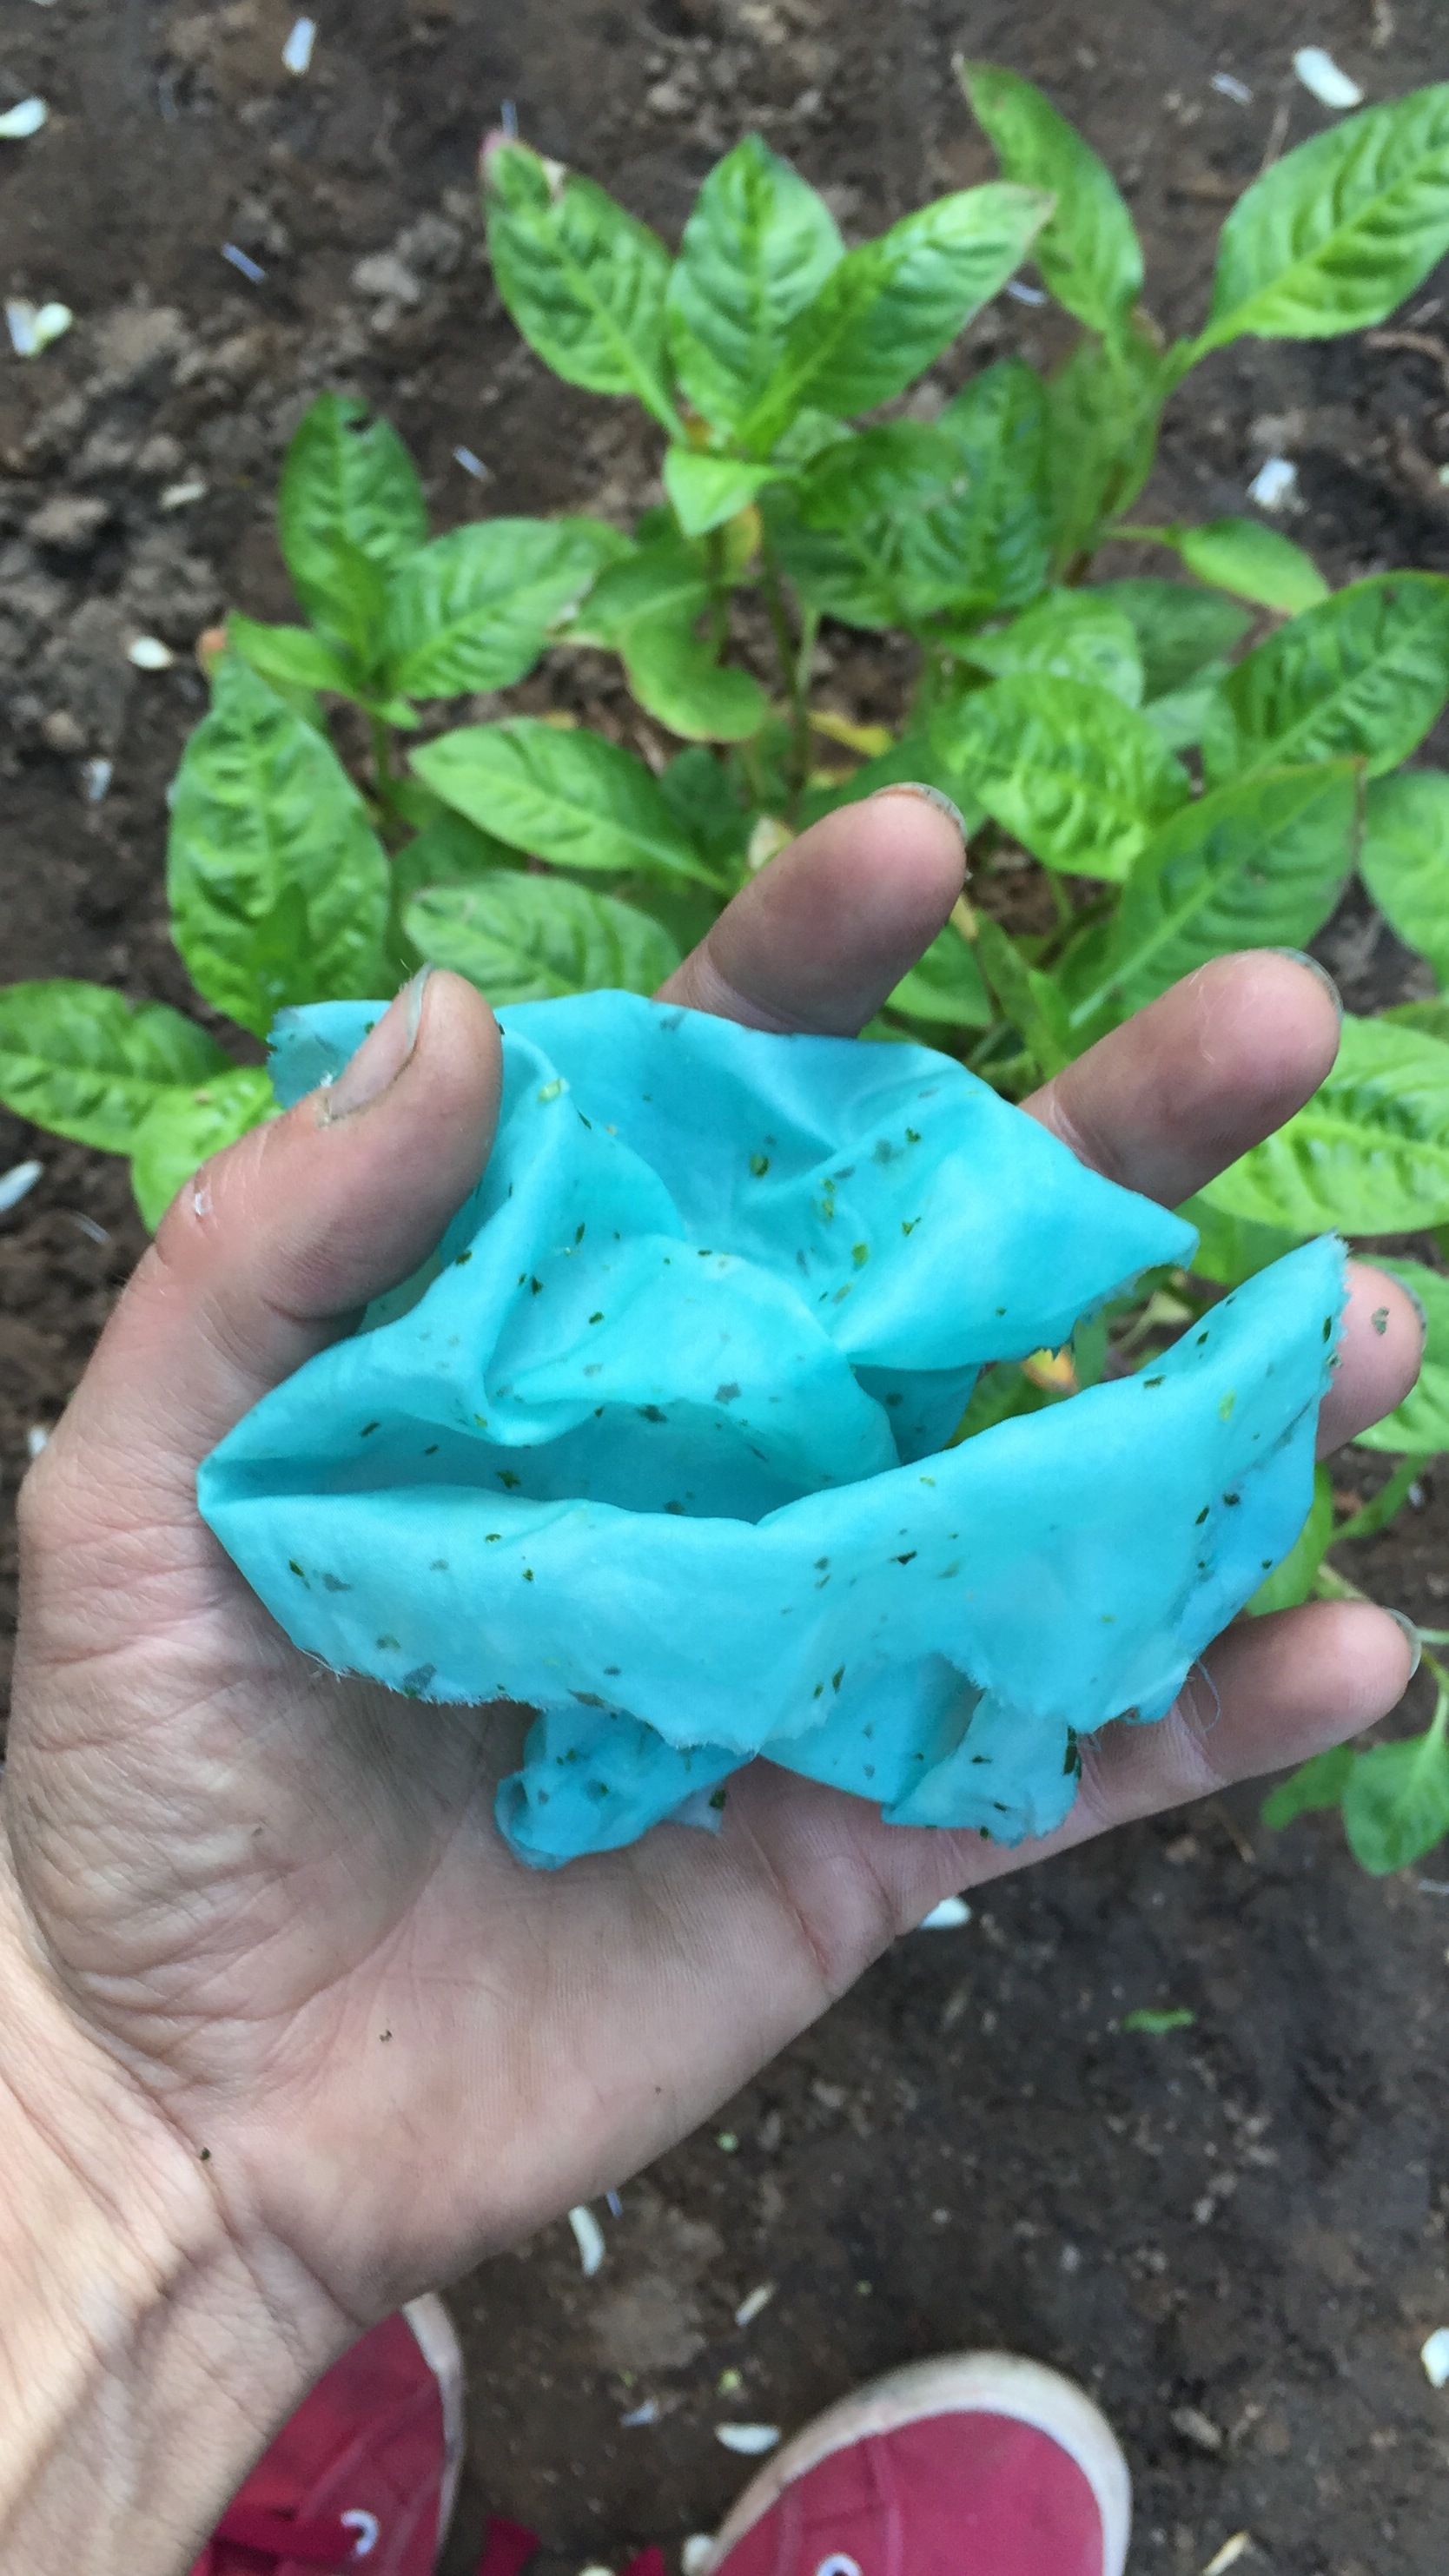
garden hands, fresh leaf indigo dye on silk yarn & fabric from my garden in october 2018


If you’re confused, don’t worry… I still get crossed eyes forcing myself to understand chemistry for the sake of my dye pots. Just take a moment to let your mind settle as you enjoy these pretty fresh leaf images from my many sessions working with this technique over the years. What is most important to remember when working with fresh leaf indigo- I have tried to include below in the list of considerations.
Basically: to work with fresh leaf indigo & achieve those exciting and exhilarating aqua greenish blues- keep a few things in mind:
Considerations for Fresh Leaf Indigo Process
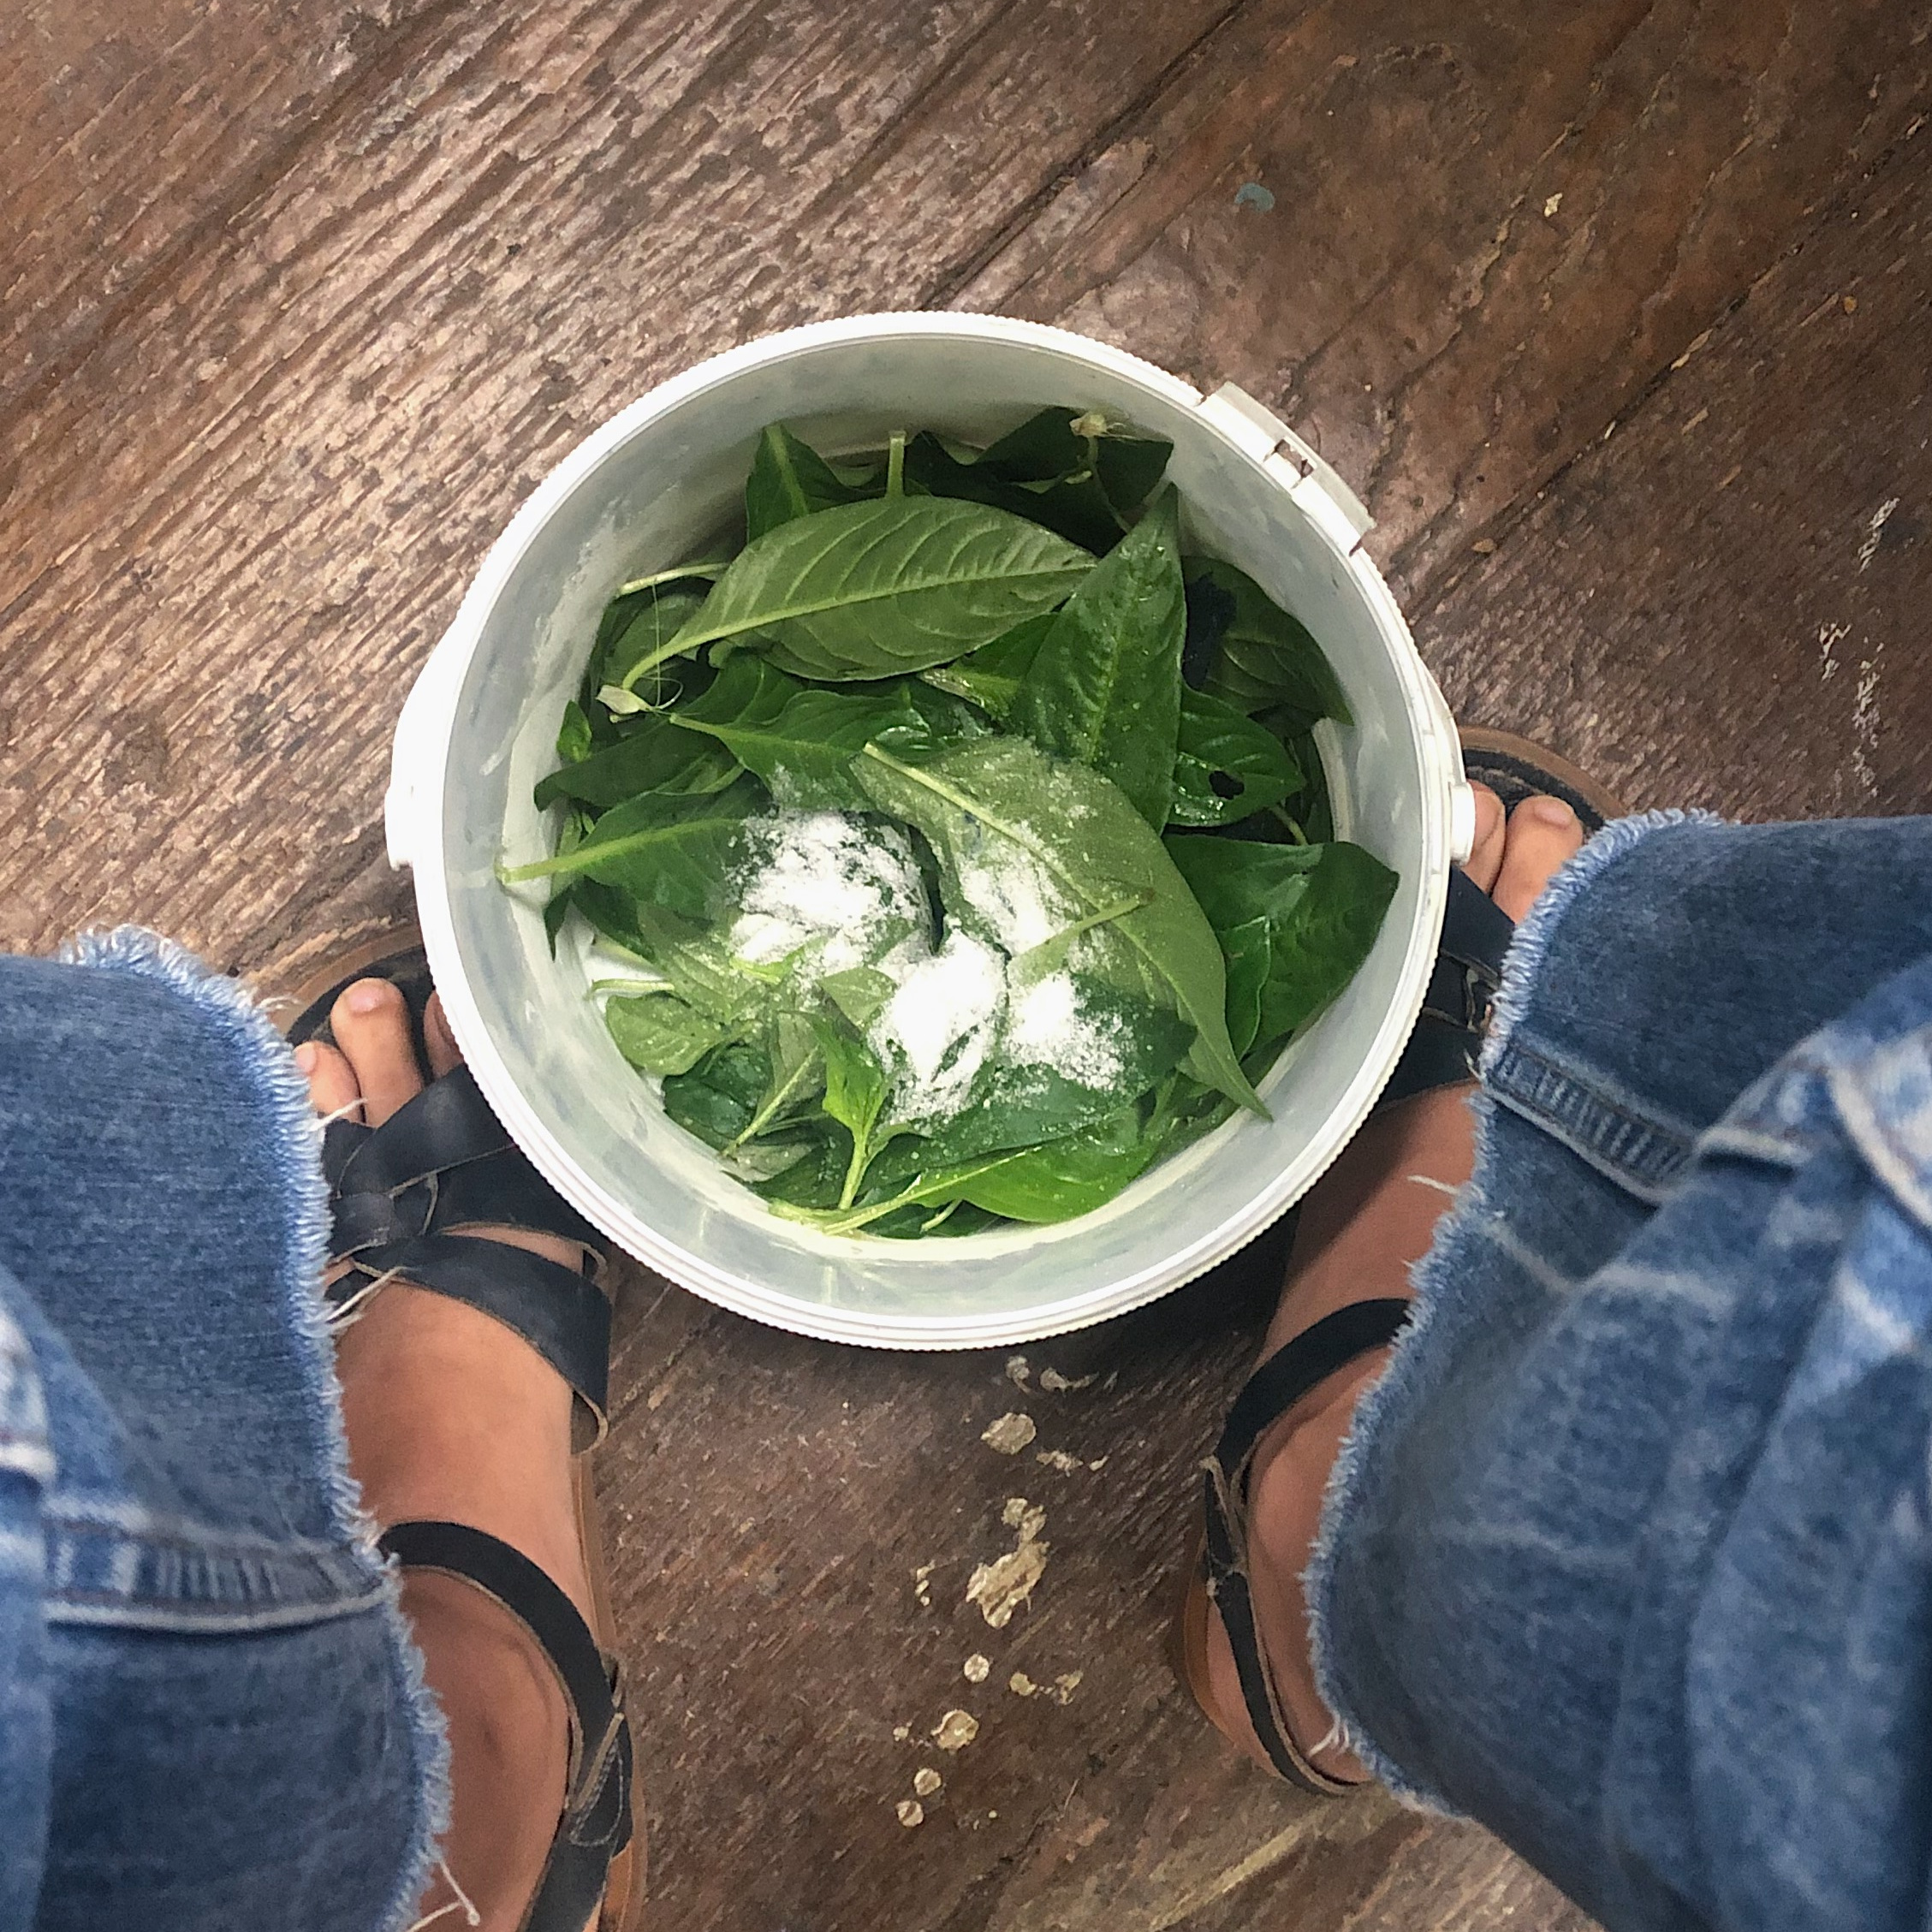
-work with fresh leaves from the garden quickly and once they’ve been picked- place them in a cool preferably damp place (the fridge works). John showed us that a simple spray of the leaves with a cool spritzer can help maintain a happy enzyme rich leaf matter while you’re stripping leaves for processing. He drapes a damp towel over them and lets them chill in the fridge if he can’t start to blending immediately after picking the stalks.
-pick indigo leaves in the cool of the morning before the sun has even had a chance to shine on the leaves and evaporate off any naturally occurring dew. The plants will also be much more hydrated and full of liquid and sap in the morning which is beneficial for this process.
-whether you choose the blender method (see my blog post here for procedure) or simple salt rub method, intend on using at least twice as many leaves by weight than fiber if you’re after saturated tones of aqua, turquoise, peacock or teal blues. The more leaves you use (or the more subsequent times you dip in concentrated fresh leaf baths) the more deep and saturated of a color you can expect.
-this process is aptly suited for protein fibers (silk, wool, etc.) - in particular silk protein fibers. So whether you find an old silk garment at a thrift shop, or purchase silk fabric, I highly recommend trying silk or a silk blend first and also running a bit of experimenting with wool if you have. I had an incredible result on wool in John’s workshop where I was able to achieve a navy blue color through repeated applications of the fresh salt rub process alone- so I also recommend trying physical pressure in tandem with fresh leaves on the other animal fibers like wool if your fiber state can handle it without felting. I’ve also had success in dyeing cellulose fiber (hemp/organic cotton blend muslin) when it was previously treated with a fresh soymilk bath and allowed to cure for a few months (see images & description below). So if you have the patience and foresight- I recommend treating some cellulose/plant fibers in fresh home made protein rich soymilk in the weeks prior to your fresh leaf indigo dyeing session to give the soy some time to cure and bond well with the fiber. John Marshall has a wonderful book all about the wonders of soymilk and it’s many applications (many of which the japanese have employed for centuries in their natural dye tradition) called “Salvation through Soy” (as well as a tutorial on how to make fresh soymilk) which I also can give glowing reviews on if you’re curious about how to make it work as a binder for your natural dyes.
-try using cold water that has been kept very cold in the refrigerator overnight as opposed to actual ice blended with tepid tap water when making your dye bath. I have a sense that I’ve been overdoing it with the ice and potentially even doing damage to my enzyme by blending my indigo leaves too cold- essentially making an indigo slushy. Very cold water is suggested by John Marshall. You may also choose to keep it as cold as possible by creating your dye bath in successive blender fulls and adding them as they’re made into a cooler or receptacle where ice packs can be added. Homemade ice packs of old milk cartons filled with water and frozen are great as they will keep the indigo dye water cool but won’t dilute the solution down by melting like the application of naked ice could. Thank you thank you John!
Below: Fresh leaf indigo salt rub method on 100% wool fabric with no mordant or soymilk treatment. Just fresh indigo leaves, a dash of salt, pressure in massaging the leaves into the cloth and a bit of water to wet out the wool right before each session. This wool saw 5 salt rub processes using 68 leaves each time, gradually building up the color from an aqua to a navy blue.


Fresh leaf Indigo Variables Testing
So apart from making sure that you keep your leaves happy and enzyme rich through the whole process of picking to the introduction of fiber, there are a few other considerations you might make- especially if you’re after a particular shade of aqua, and our workshop tests may help lead you to the mermaid palette of your dreams- so read on!
We decided to throw in a few variables in the fresh leaf process and monitor the resulting colors. These are by no means all the possibilities for what could be done to the process to alter the end color- but they seemed to be the most important to test among our group of experienced indigo dyers. If you have any suggestions or ideas on other variables that might alter the results or lend toward a longer working time or more efficient way to reap more color- please note in the comments below!
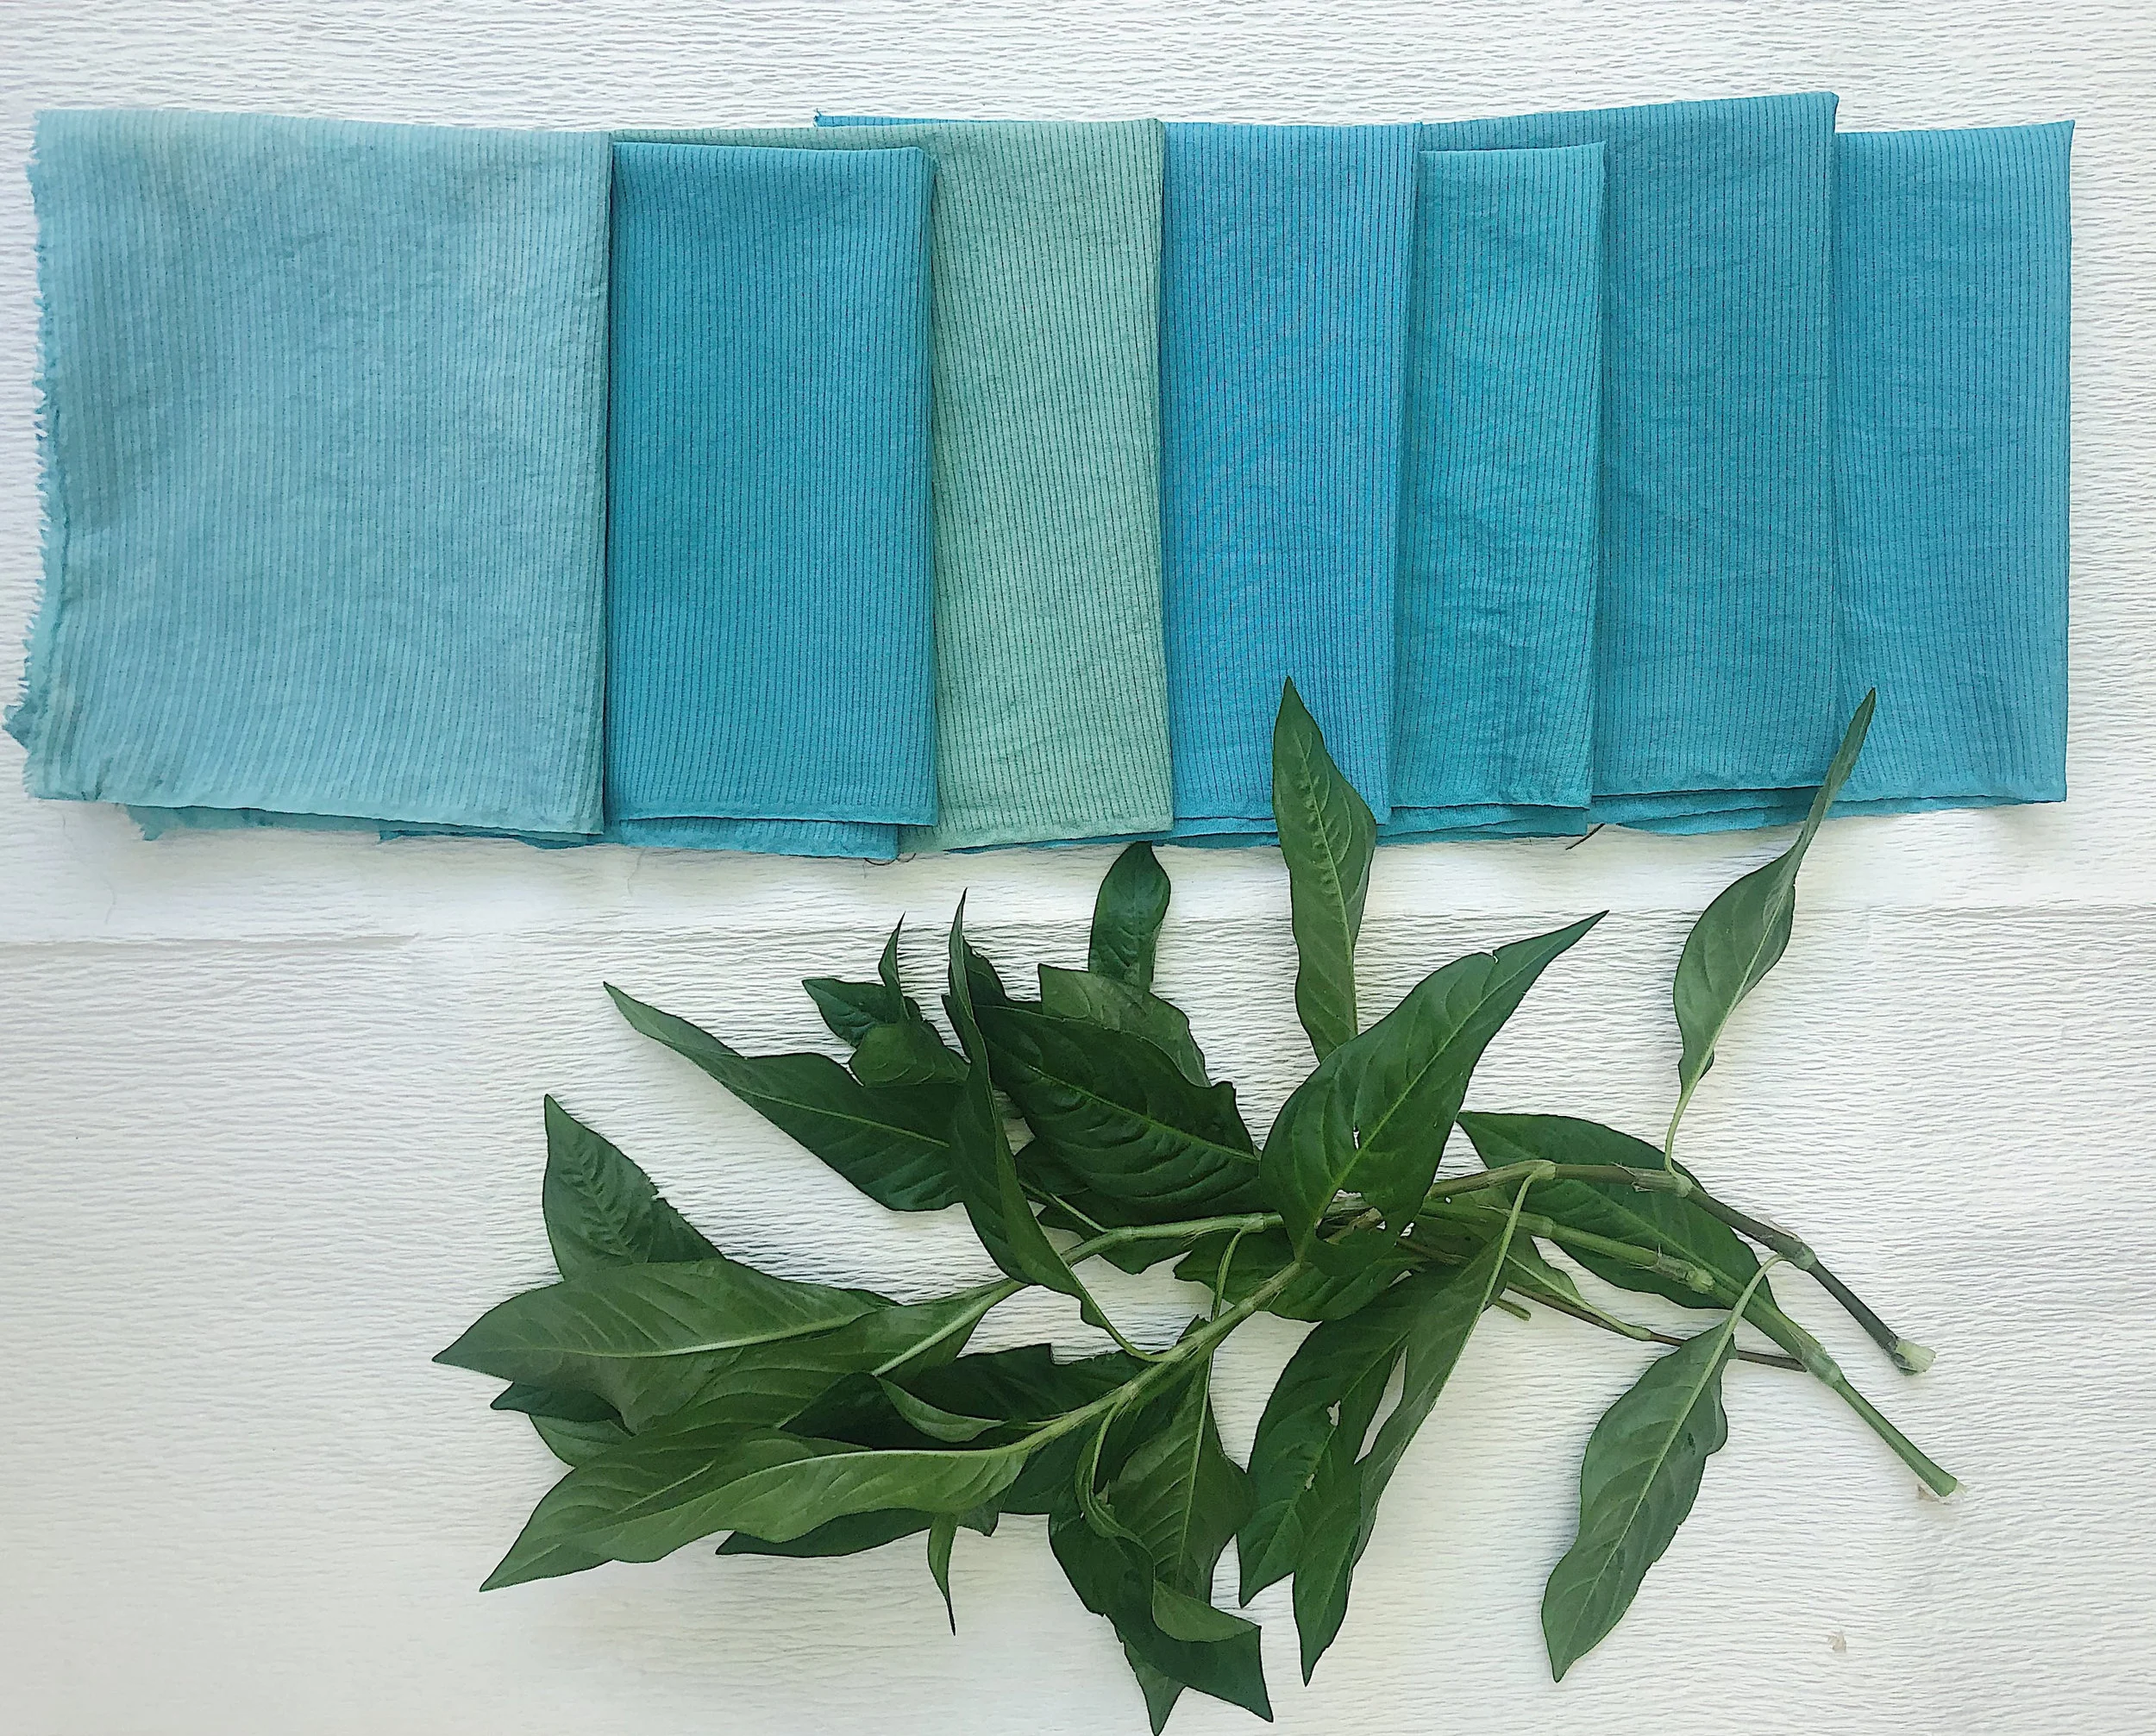
We made a big concentrated fresh leaf solution keeping it cold and working quickly to ensure the beta glucose was in tact and would still (as John put it) “allow our indigo to shake hands with the oxygen and fiber” :) After creating our large batch of fresh leaf indigo- it was divided into 8 separate containers, to which each was introduced the same quantity of fabric. Silk was added to containers 1-7, and various other fibers including different types of linen, a silk/hemp blend, and cottons were added to container 8. The fibers sat in the dye baths and were stirred occasionally for a little over an hour. Below is the list of different amendments we made to the fresh leaf dye baths with pH noted also noted for each in parentheses:
Container 1 (6.5pH): No change to dye bath- fabric was rinsed immediately after removing
Container 2 (7pH): No change to dye bath- fabric was NOT rinsed after removing
Container 3 (6pH): Addition of Alum Sulfate mordant to dye bath
Container 4 (6pH): Addition of Chrome mordant to dye bath
Container 5 (12pH): Addition of Calcium Hydroxide (alkaline modifier) to dye bath
Container 6 (5.5pH): Addition of Vinegar (acidic modifier) to dye bath
Container 7 (12pH): Addition of Calcium Hydroxide & Fructose to dye bath
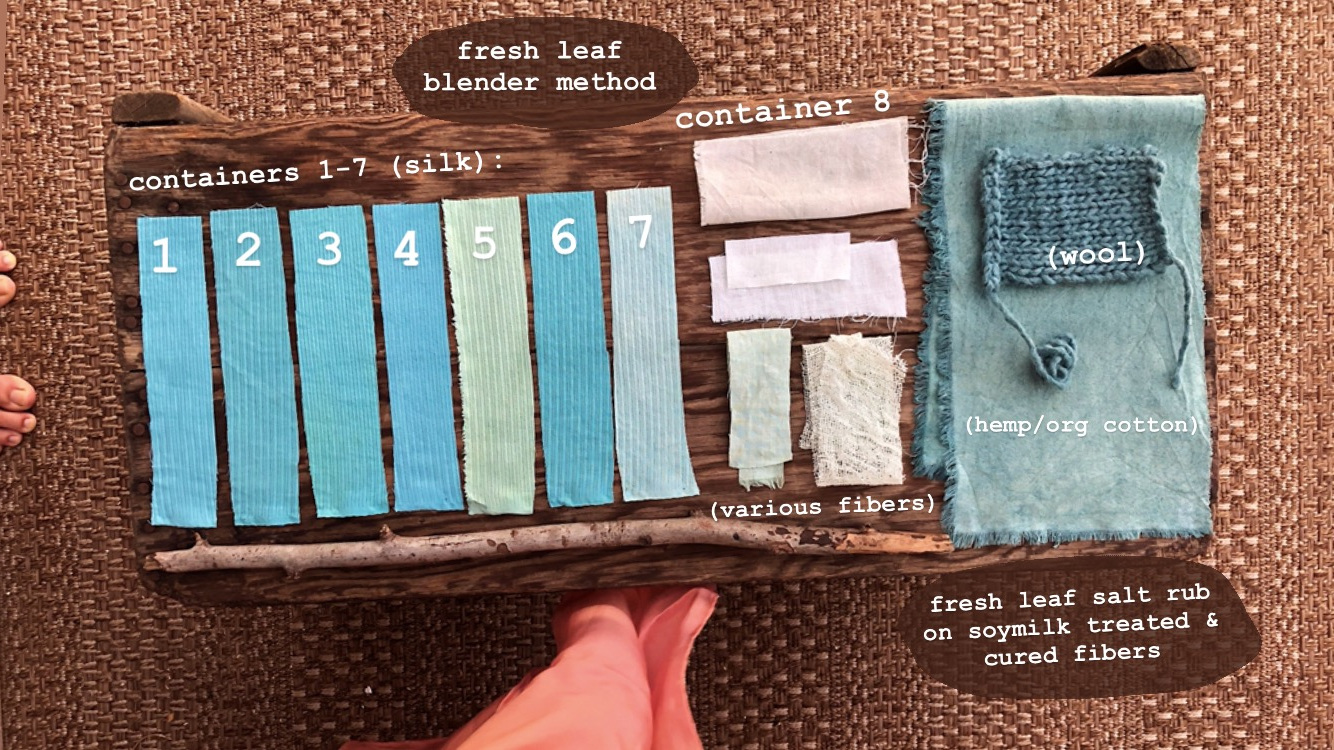
As you can see from the photo above- the range between colors can vary namely depending on the fiber type pH, and metal salts present. The fibers in the ‘various fibers’ section are all mostly cellulose without a soymilk pre-treatment, which explains why they did not take much color and in clockwise order starting at the top are: cotton, linen, cotton and hemp/silk (70%hemp / 30%silk). I’d like to do a few more tests on my own to compliment these and see how the colors fare with UV light exposure, as well as conduct a study on soymilk after treatment as a protectant against UV sun exposure like John has published in his newest book “Singing the Blues” .
If you’re in hopes of preserving a more greenish blue tint from your fresh leaf dye bath- I recommend premordantng your silk in alum sulfate or adding a bit to your fresh leaf bath. You may also consider holding off on rinsing immediately and letting the fabric oxidize and dry before rinsing to preserve a bit more saturation of color. A slightly acidic environment also resulted in a slightly more intense color- where a very alkaline environment quickly precipitated the indigo out of solution and made it unavailable for the silk resulting in paler minty green colors. So if you’re attempting fresh leaf indigo, it might be wise to check the pH of your water (especially if you’re on well water) and if it tends towards base or alkaline- add a bit of lemon juice or vinegar to keep your indigo and enzymes happy, fresh and fully available for your fabric.
The last container- Container 7 held a mixture of mostly cellulose fibers shown below- all resulting in lighter shades, with almost no blue apparent (with the exception of the 70%/30% hemp/silk bend).
Fresh Leaf Indigo on Plant Fibers
When I returned home, I was eager to test a bit of cellulose fiber that had been treated with homemade soymilk earlier this summer (exactly 2 months ago) and had had plenty of time to fully cure before attempting the fresh leaf method. The past attempts Ive made at fresh leaf indigo dyeing cellulose fibers had left me a bit discouraged as I hadn’t been patient enough in waiting for the soy to fully cure on the fiber (maybe waiting just a few days instead of weeks) and the resulting color was a green, not a blue. And when I saw Rebecca Desnos achieve a blue tone on a semi-cellulosic (bamboo fabric) (her process is detailed on her blog) last year- I knew I must try a plant fiber coated in protein rich soymilk and plan ahead to allow the soy to cure. So after visiting the king of soymilk and indigo in North America- John Marshall, I was motivated to make it happen!
I picked about 70grams of indigo leaves in the morning as I had previously weighed my soymilk treated and cured fibers to be about 30grams ( a piece of hemp/organic cotton muslin, and a few dozen yards length of wool yarn). I’ve also been curious to see about the effect of soy as a binder in aiding the blue dye adhesion on wool since most of my experiments with wools have given a more pale blue green or jade color. I intentionally picked a little more than twice the weight of the fiber to be dyed in indigo leaves to ensure ample color potential. I decided to chose the salt rub method to coax the fresh leaf indigo color on the fabric since I had had such a nice result on wool in John’s class- getting nearly a navy blue on non-soymilk treated wool with repeated sessions on the same fiber building up the color. There’s something to be said about physically coercing the color onto the fabric or yarn as you rub it straight from the leaves onto the textile without any waste of water or dye. After adding a dash of salt to my leaves and massaging for a few minutes- I added the wetted out wool and hemp/organic cotton (I chose to wet them out with ice cold water) and massaged all the leaves, salt and fibers together over a glass pie tin for about 15 or 20 minutes. My daughter was keen to know what I was doing and get involved herself. She helped me massage for the last few minutes when it became apparent that the color would most certainly be closer to blue than I’d ever seen on a true plant fiber. I let the fabric and yarn dry in the shade and held off on rinsing for a day. The color has stayed- and I’d like to perform a lightfast test with a soymilk afterbath as well.
Below: Success at finally achieving a blue color using the fresh leaf indigo method on a plant fiber & wool!